Friday, April 27, 2012

Sister's Animal Prints


Ever since I developed a polish habit, my 3 younger sisters have certainly benefited. After school they love to come over and decide what they will change their color to for the next day. They were very excited when I got my Konad stamp kit because they love animal prints. It didnt take them very long before they showed up asking me to do it for them. I had no problem with that because I get more practice :)


I am limited to only stamping in black and white right now, but now that I know I like the way the stamps work i will order more colors of the "special polish."


Seriously, order the special polish! I've tried regular and it just doesn't stick well enough!

Once again, I used Stamp 57 from Konad for both girls. Very Cheap from Amazon, between 2-5 dollars depending which person you order from. I am excited to get more!


Madison, who is 15, wanted cheetah. We chose to use Orly-Lemonade and Essie-As Gold as it Gets for the base color and Konad's black special polish for the cheetah pattern. I only did one coat of each and the Orly looked awful but by the time the print went on, you couldnt even tell.


I wish you could see As Gold as It Gets more in these picture.s. In person, it give the manicure a little something extra than if we would have just stayed with Lemonade. Maddie almost didn't let me add it. 


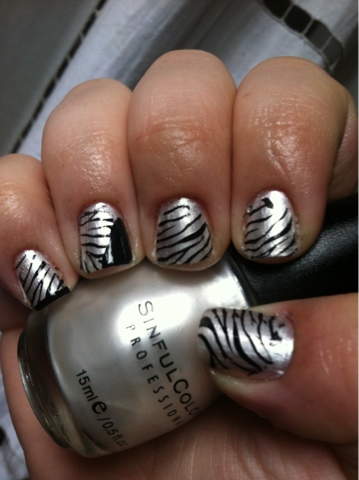
Alea, who is 17, wanted zebra, like I did on Christinas in the blog before. Only she is obsessed with this neon pink so we did that instead of the light purple. 

These polishes are Sinful Colors-24/7 and Konad's special white polish. Simple enough :)


I have learned with this stamp to make sure that you are consistent with the direction you place it on the fingernail. I messed up a couple times having the stripes go vertically and it looked just like wood grain...maybe a good idea for another manicure in brown?


They are very happy with their nails. Alea keeps showing everyone we see and says she never wants to take it off. And I'm tired of painting nails for the day. (I also did mine...but saving that for the next blog) 

Hope you get inspired by the color selections... what colors would you do if you had these stamps?! 


Wednesday, April 25, 2012

Christina's Nails

My friend Christina came over and let me try out my stamps on her! We had to get her nails all perdy before her night out! Her color combination came out much better than mine that I did in the previous post. Stamping is getting easier as I practice with it. 

If you want to know how to do this...just ask!!


Her base coat is Essie-"Play Date", the zebra print is Konads special stamping white polish, stamping plate 57, and we topped it off with China Glaze-"Fairy Dust" 

I love the way her nails came out! Probably because I am extremely jealous of her nail beds. Mine are so deep, I wish I had hers!

We had to re do a couple nails because I missed spots but we got it done in time. 


 I dont have much to say about this manicure except, they are so fun!! The "Fairy Dust" made them extra cute. :)


Seche Clear as the base, 2 coats of Play Date, One stamp of the zebra in plate 57(konad), 1 coat Fairy Dust, and Top coat is Seche Vite, as always. 


I'm getting better at using the stamps!

Tuesday, April 24, 2012

First Stamping...Zebra!


 Yay! I tried something new and I actually like the way it turned out! This was my first go with trying out Konad's stamping plates. I decided on that brand from reading other people blogs. I'm so happy I bought them! They were very cheap from Amazon. The crappiest part was waiting for them in the mail.


Below is what I recieved (minus the mash brush set, I already had that) I got 2 plates, a double ended stamper, a scraper, and 2 colors of the special stamping polish (not pictured). 


I used Sinful Colors-"Tokyo Pearl" as my base. First time using it and I'm glad i intended to put designs over the top because it was so streaky. You could see every brush stroke. The black is Konad special Stamping polish.


Sinful Colors-Tokyo Pearl
Stamped, before clean up


My first couple attmepts, i went waaaay to slow so it wasnt working right. I watched good ol' youtube for a couple tutorials and that really helped. Must do the application as fast as possible!


Zebra!


I did make some mistakes and I tried to cover it up with some solid black, luckily the worst mess up was on an accent nail, so it almost looks intentional. 

Left Hand


I cant wait to try the other stamps!

Monday, April 23, 2012

Guilty of New Polish

Guilty of giving in and buying new polishes.  


OK first, I am having a huge problem with breaking my nails and I have had to file the others down to try and blend them in. This had made me not want to post pictures because my nails look awful. I even did a color in between this and my last post, but it looked so bad it wasnt worth sharing. I am wondering if its because I changed the shape of them? I went from their natural curve to squaring them off. Does that make a difference, because I will definitely go back if it does! help! 


Second, I caved. A mix between, breaking several nails, an ulta coupon and a sale of buy 2 get on 1 free led me astray from my goal of not buying any new polishes until all the old ones were used at least once. Ashamed to say that I just did a count and I bought 10 since I made the promise to myself. ....O well...i'll look on the bright side, more polish for me :)


These are Zoya-"Opal" and Essie-"Pretty Edgy". When I got the Essie home I realized it was very close in shade to my Orly-"Lucky Duck"  I need to stop getting greens. For some reason they take up the largest portion of my collection and I'm not even a huge fan lol 

Application was smooth. Took 2 coats and as essie usually is, very shiny even before the topcoat. This is my first zoya!


Looks good on! I like it so much I may just leave it on for another day. I even got a package from amazon today with my stamping plates in it, which i am dying to try! That should be an interesting post. I dont know anyone who does it so I will just have to watch youtube to figure out the tips and tricks!

Sorry for the lack of pictures, but my nails aren't very inspiring right now.


Friday, April 20, 2012

"No Polish Left Behind" Pt.2

Pt. 2 

I actually had a hard time choosing which polish to try out next. I ended up choosing Essie-"Brooch the Subject" (very odd name) I figured since I had just taken off some bright neons, i could go the opposite and go nude. This is not a color in my character, it was a clearance buy for 3 dollars. I'm such a sucker for them when they are that cheap. I have had it for about 2 months. I always tell myself that someday, I may have a use for it, and that's how they get left behind. Being a stay at home mom, I go nowhere and do nothing. Haha. So basically I do my nails for myself instead of having to match them to and outfit or event. I either need to learn to love them all equally or stop buying polishes I don't fall head of heals for. 

I had a ridiculously hard time with this color. It wasn't the polish, (unless i can blame its very slow dry time), I just kept bumping my nails. I had to repaint 3 times while waiting for the second coat to dry so I could add in some sparkle. I got so frustrated, I said screw it and went to bed with unpainted nails.  

With NO sparkles.


Without anything over the top of it it felt very "latte."

I added in China Glaze-"Fairy Dust" for a little something to catch the eye because the Essie polish was so nude, I wasn't sure what to do with it.  The China Glaze isn't apart of NPLB. It added just what I needed to say, "I like my nails today!"


My application sucked. :( I'm working on it!


Seriously, this paint does NOT want to dry, even with Seche Vite top coat. Not sure whats going on, but its driving me nuts. 


I ended up liking this polish (not loving like in pt. 1). If I ever need a break from vibrant colors, this will be a go to. 

Tuesday, April 17, 2012

Neon Summer

OK, This is not Part 2 of "No Polish Left Behind" (click here for Part 1), but I couldnt help myself. These 2 bottles are the reason I told myself I had to do NPLB. They were and are going to be my last purchases before I finish using what I already have. This needed to be done, lol. 

They are both brands I have never used but are so inexpensive I had to give them a try. Sinful Colors-"24/7" was only 1.99 at regular price! Color Club-"Age of Aquarius"  was on sale for $3. 

I. Love. These. Neons. 


Seche Clear Base, Sinful Colors-"24/7", Color Club-"Age of Aquarius", Sech Vite Top Coat. 

None of these pictures are using a flash, they are all taken by an open window using natural light. I have also decided to reshape my nails (again) so they are much shorter than they were. Going back to squarish. 


I did 3 coats of each color just to get the maximum potential out of each color.  Unfortunately, my camera really dulls down the vibrancy. 


I knew right away that the Sinful Colors (neon pink) was going to POP so I used it as the accent on my right hand. But the show stopper (at least in person) is Age of Aquarius. It does not disappoint. 
When i saw it on the shelf my jaw dropped and I knew instantly, it was to be mine. Funny thing is, I wasn't even going to look for polish. I was picking up something for my husband who had dental work done that day. I have never seen this color before and I don't own anything like it. Definitely worth the 3 dollars!! I wouldn't miss out on this. 


I am vowing to get a better camera so that way maybe someday I can share the true colors of my polishes. 


The Sinful Colors didnt have very good application, but i didnt have high expectations. It was chunky. and streaky, and dried almost so fast that i could barely smoth it out over my nail. I'll still buy more of them because of their price. They just wont be my favorite.


Just a shot with some different lighting.

When I finish "No Polish Left Behind" I will be out there getting a cart full of these 2 and 3 dollar polish brands. Happy girl here.


Monday, April 16, 2012

"No Polish Left Behind" Pt.1

Part 1.

I am trying to force myself to use all the polishes I already own, before buying more. I have between 10-20 that have never been used on my nails and I just don't want my beauties to be forgotten!

So, because of that, I have decided to do several blogs in a row featuring bottles that were purchased and never used. I am calling it, No Polish Left Behind. This is Part 1.


I have a slight obsession with Essie. I feel the need to own them all, and so I just keep buying them. I love their cute little shaped bottles, which fit together in drawers perfectly and their awesome color selections. Some of Essie's polishes definitely have better coverage than others, but I don't mind having to apply 3 coats to get the solid look.  China Glaze is another brand that I own a decent amount of for the color selection.


These two I've had for about two weeks. Not really a lengthy time but long enough to warrant usage.
The China Glaze accent nail is from their new collection called Prismatic Chroma Glitters. It caught my eye instantly when I saw it in the store. Indoors it looks mostly like light blue sparkles with the smallest amount of multi-colored glitter. Outdoors it has a much more dimensional coloring to it. Almost a lavender holo look. I love it outside, and also compliments the Essie color better in the sun. I only put one coat on over one coat of the Bangle Jangle, so it will be interesting to see the difference the next time I use and do a couple coats.

The main color is Essie's "Bangle Jangle". It was a clearance buy at Ulta for 3 bucks. I swear, my favorite colors were all bought on the clearance rack. This one is now easily in my Top 5. I was not expecting it to be, but its so...calming. I feel so at peace and pretty at the same time when I look down at my hands. It took 2 coats of application, and its very lavender. 
China Glaze-"Liquid Crystal" and Essie-"Bangle Jangle"

Essie Bangle Jangle And China Glaze Liquid Crystal

I sure wish that you could see the color dimensions of the Liquid Crystal. Pictures don't do it justice. I do like it but I'm not sure I will be running out to buy the others in the collection. I would like to find a holo that i swoon over!


Thumb Nail, natural light


I'm SO happy I started this little challenge for myself because I ended up with a new favorite polish that had been sadly overlooked due to my buying obsession. Who knew?! I'm glad I didn't leave these polishes behind. 


Part 1. Complete. ;)


Saturday, April 14, 2012

Not my night.

           I started out tonight excited to try out the saran wrap look. 


The idea is to paint your base color and let it dry, Then paint the second coat a different color and before it drys you dab it with a small amount of balled up saran plastic wrap. It removes just enough color to give you a marbled look.


Suprise!... It didn't go as planned. I think it might have been my color choices? The combination ended up looking a little sickly. I went with Essie-"turquoise and Caicos" and Essie-"fruit sangria"


                                                    Tip! 
If you want to do this technique, make sure you pick polishes that have great coverage. If it takes more that one coat, it's a no go.

Fruit sangria went on fantastically with one coat, and while I love turquoise and caicos, it was not a good pick for this as it needs 3 coats to look solid.


The Saran wrap was only applied to one hand and I knew from the way it came out I wasn't going to keep it on so I decided to try out different top coats (matte and glossy) Then to my other hand I just put on some glitters to see with the color combinations would look like.


The middle is perdy!
After that learning experience I let my little sister pick out what I would do next and she picked China Glaze-"smoke and ashes" with a gradient of Essie-"as gold as it gets"


Here's where I say, it's not my night. I didn't like this either.


All in all I did enjoy spending the evening painting nails with my sister. (we did hers too and our toes) but I will be taking this off in the morning and replacing it with something happier.


                                           Glad I could share my not so great manicures!

Friday, April 13, 2012

Ombre Try #2

Today I took advantage of my son taking a nap and decided to try out the "ombre" manicure I've seen all over Pinterest within the last couple weeks. I did try it right before Easter, but i used different colors that were all pastel and it just looked like a mess. So i learned, keep it similar.


You take a makeup sponge and dampen it. Paint the colors you want right next to eachother and softly touch it to a piece of paper to meld the colors together before putting it on your nail. If you put enough paint on the sponge you can get about two nails done before needing to reapply the paint. 
From left to right: Orly-"Lemonade", China Glaze-"Papaya Punch, Piggy Polish-"Pumpkin", and Essie-"Braziliant"

Before I cleaned them up.


I realized right before I started getting rid of the excess polish that they ended up looking like candy corn! haha
After Cleanup


I do like them but I'm not sure how long they will stick around due to the fact that I feel very Halloweenish.